Create & Configure a Summer
School Schedule
Select Students,
then Scheduling, then Schedule Manager.
Click  Create Schedule,
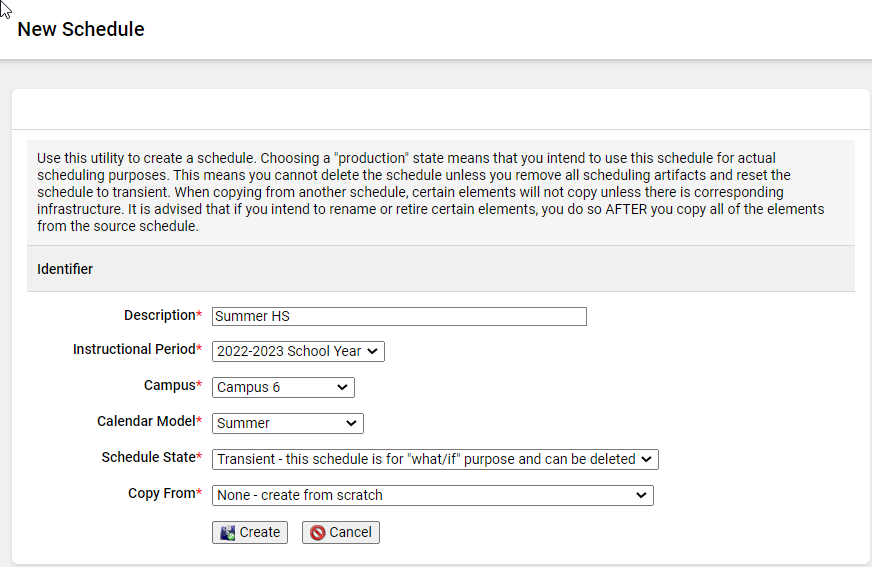
and the New Schedule window
opens.
Create Schedule,
and the New Schedule window
opens.
Complete the fields
as described and illustrated below.
Description:
Enter a name such as Summer School.
Instructional
Period: Select the current year.
Campus: Select
the campus for which you’re creating the schedule.
Calendar Model:
Select Summer or Summer (2 terms).
Schedule State:
Select Transient.
Copy From:
Leave the default of None or select the options that best fit
your needs.
Click  Create.
Add schedule days
Click on the Periods
tab, then click  Schedule Days.
Click Add Schedule Day.
Enter a Name,
such as Summer School, and check the boxes for the days of the week
— typically Monday through Friday.
Click Save.
Click  Return to Scheduling
Information Menu.
Return to Scheduling
Information Menu.
Add periods
Click Periods, then
click Add Period.
Enter the Code
and a Description such as Summer.
Select Scheduled
in the bottom section, and enter the Start Time and End
Time.
Click Save.
Click Return to Scheduling
Information Menu.
Return
to the top
Add a schedule track
Click Schedule Tracks, then click Add Schedule Track.
Enter a Name
such as Summer School.
Check the box to
include the Period in the schedule track. Then click the radio
button for the period in which attendance will be taken.
Click Save.
Click Return to Scheduling
Information Menu.
Edit the calendar dates
Click on the Calendar
tab.
Click Edit Grading Cycles,
and change the dates to match the summer term.
Click Save.
Add offerings for summer school
Click on the Offering
tab, then click Add Offering.
Select the Course,
and check the Terms Offered box.
Click Save. The record
is saved.
Click Add Section(s).
Enter the Section
Number, and check the Periods box.
If teachers will
be using the Grade Book, select the Teacher of Record.
Click Save.
Continue with Step
4: Enroll students
Return
to the top
Return to Link
a Summer School Attendance Track to a Campus
Return to Summer
School Attendance